


Mini Hasselback Potatoes


This post may contain affiliate links. Please see our privacy policy for details.

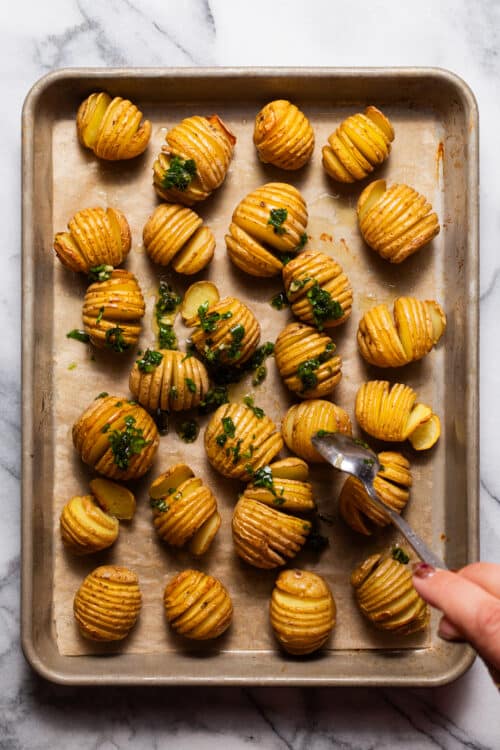
These mini hasselback potatoes make for the perfect side dish to elevate any meal! They’re crispy crunchy on the outside, soft on the inside!

Featured Comment
why you’ll love Mini Hasselback Potatoes
- Maximum crispy texture. We’re talking perfectly crispy on the outside and melt-in-your-mouth tender on the inside, really letting the seasonings soak into every single crevice. And the garlic and fresh herbs gives it just enough flavor without overpowering your main entree.
- No peeling required. You can leave the skin intact, substantially cutting down on prep time!
- Quick cooking time. Because the potatoes are smaller (petite gold potatoes), they will cook through much faster than traditional russet potatoes that are typically used.
- Makes for easy serving. Their miniature size makes them so easy to serve at dinner parties, big family gatherings, potlucks, and holiday get-togethers.

What are Hasselback Potatoes?
A hasselback potato is a whole potato cut into very thin, evenly-spaced slices without cutting all the way through to the bottom. The slices stay intact at the bottom, letting the butter, oil, and seasonings soak inside until they are soft and fluffy while the edges are extra crispy.

How to make Mini Hasselback Potatoes
- Prep the potatoes. Wash the potatoes and pat them dry using paper towels.
- Create a flat base. Slice a tiny sliver off the bottom of each potato so that it does not wobble or roll around.
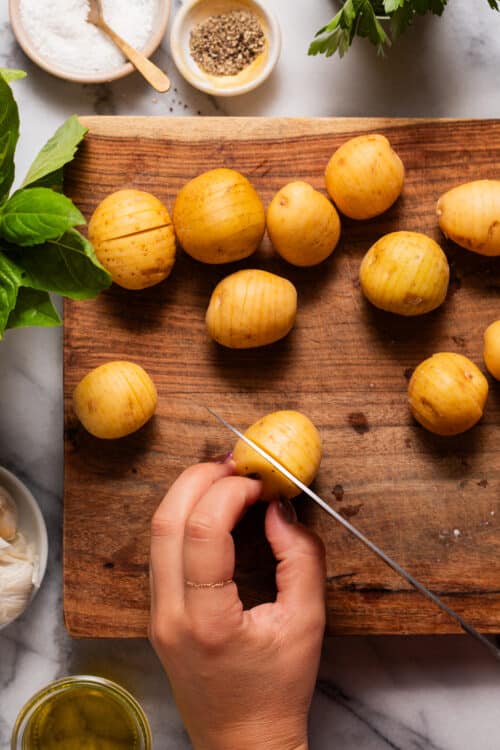
- Set a cutting guide. Place two chopsticks or wooden spoon handles on both sides of the potato, forming a “t”.
- Slice the potatoes. Working carefully, make thin vertical slices across each potato, about 1/8-inch apart.
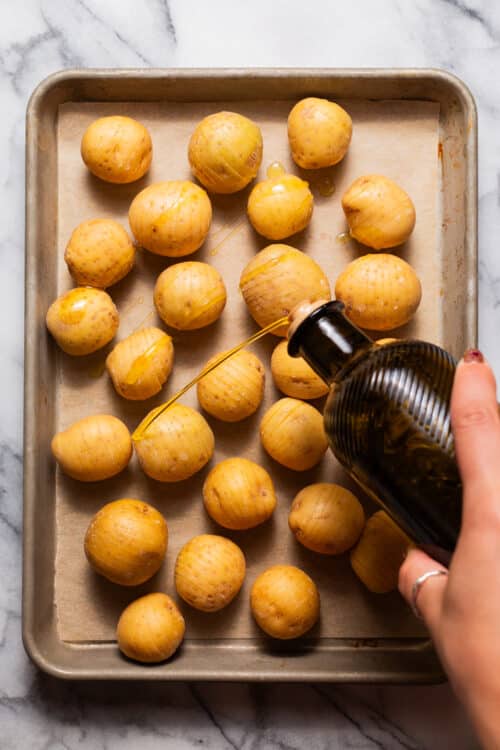
- Season the potatoes. Place the potatoes, cut side up, on a baking sheet lined with parchment paper in a single layer. Drizzle with olive oil and season with salt and pepper, ensuring that the oil and seasonings get inside the little slices.
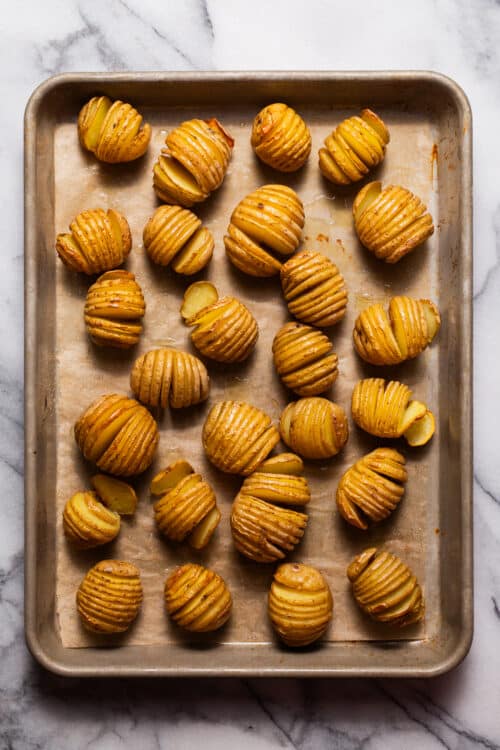
- Cook the potatoes. Roast the potatoes at 425°F for 45-50 minutes until the edges are crispy and the insides are soft.
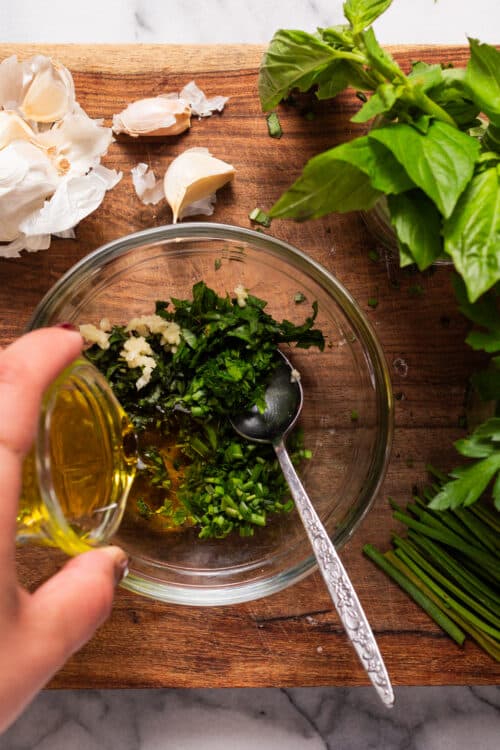
- Make the herb mix. Stir together the olive oil, basil, chives, parsley, garlic, salt, and pepper.
- Drizzle and serve. Drizzle the cooked potatoes with the herb mix until evenly coated and seasoned. Serve warm.


Tools For This Recipe
Mini Hasselback Potatoes: Frequently Asked Questions
Hasselback potatoes was named after a famous restaurant in Stockholm, Sweden (Restaurant Hasselbacken) where a student chef working at the restaurant, Leif Elisson, invented the slicing technique in 1953.
Set up guide rails such as chopsticks or wooden spoon handles that will stop the knife from slicing all the way through to the bottom.
Not at all! Parboiling beforehand will prevent the potatoes from fanning out (the signature accordion shape), making them prone to collapsing.
Yes! The potatoes can be cooked in the air fryer in a single layer at 375°F for 25-30 minutes until golden and crisp.
Store leftovers in an airtight container in the fridge for 3-4 days, reheating in the oven at 375°F until warmed through.
Freezing is generally not recommended as the potatoes can become grainy and watery upon thawing.


Mini Hasselback Potatoes
Ingredients
- 1 ½ pounds petite gold potatoes
- 6 tablespoons extra-virgin olive oil, divided
- Kosher salt and freshly ground black pepper, to taste
- 1 ½ tablespoons minced fresh basil leaves
- 1 tablespoon minced fresh chives
- 1 tablespoon minced fresh parsley leaves
- 1 clove garlic, finely grated
Instructions
- Preheat oven to 425 degrees F. Line a baking sheet with parchment paper.
- Using a sharp knife, make crosswise cuts in each potato, about 1/8-inch apart, stopping about 1/4 inch from the bottom.
- Place potatoes in a single layer, cut side up, onto the prepared baking sheet. Drizzle with 2 tablespoons olive oil; season with salt and pepper, to taste.
- Place into oven and bake until tender and crisp, about 45-50 minutes.
- In a small bowl, combine remaining 4 tablespoons olive oil, basil, chives, parsley and garlic; season with salt and pepper, to taste.
- Serve potatoes immediately, drizzled with olive oil mixture.


Equipment

Notes
- Start with a flat base. If needed, slice a thin strip off the bottom of the potato so that it sits flat without wobbling or rolling when slicing.
- Set up guide rails. Lay two parallel chopsticks (or wooden spoon handles) with the potato in the middle (like a “t”). Make vertical cuts across the potato until the guide rails stop the knife, preventing you from slicing to the bottom.
- Keep the slices thin. Aim for slices about 1/8-inch apart so the potatoes can fan out properly when baked.
- Fresh herbs are best. Although you can certainly substitute dried herbs, fresh herbs are ideal here, delivering the best kind of flavor. This is also a great time to use up all the leftover herbs from your holiday turkey or leg of lamb.
- Use a good quality sheet pan. A durable sheet pan is ideal – it will last for years with minimal wear and tear, and will help achieve even cooking and avoid warping at high temperatures.
- High heat is key. Roasting at 425°F will ensure maximum crispness, opening up the slices into a fan while softening the interior.
Did you make this recipe?
Tag @damn_delicious on Instagram and hashtag it #damndelicious!

These were delish! My kids ate them with just the olive oil on them. My husband and I ate it with the topping and added some lamb broth from the main dish into the topping. So very good and so easy!
Great side dish with myroasted lamb and roasted carrots and Brussels sprouts. I think I also used your lamb and Brussels sprouts recipes.
Made these to go on a “Baller Board” for a friends birthday celebration. They were so easy, looked impressive and were delicious! Birthday girl asked for the recipe. So it’s going in my arsenal of tried and true recipes.
Outstanding!
I think confusion of step 6 is that you don’t specify what the olive oil mixture is. I know, seems like it should be obvious, however, new cooks and/or folks who may be a little tentative with new recipes, are following instructions to the letter.
Refer to step 5.
That spoon idea was genius! Made for perfect cuts. Cooking them tomorrow for Easter lunch!
Sorry I found these far toooo oily. I usually use melted butter instead of oil and find this muuuuch nicer
I also use the wooden spoon method for cutting and find this ideal
These are so simple, easy and delicious. I served with sour cream (I added salt, pepper and some olive oil to it.)
Thank you for the recipe!
Hey there.
If I’m making the roasted leg of lamb recipe and these together.. How should I do it?
Like how much time should I give the potatoes and how hot of an oven should I use for the lamb and potatoes?
Thank you
Recipe is incomplete. After herbs and oil are in bowl, then what? Inverted blender????
I am sorry you are having so much difficulty, Lindsay. The olive oil mixture is drizzled on the potatoes once they come out of the oven. This is indicated in step 6, making the recipe complete. 🙂
I am looking forward to making these on Sunday this weekend. But in step 5 of your directions you don’t say what to do with the fresh herbs and olive oil. I presume I am supposed to sprinkle them over the potatoes. But you need to actually SAY that in the directions!
Dorothy, this is mentioned in step #6.
6. Serve potatoes immediately, drizzled with olive oil mixture.
Dorothy and Lindsay having difficulty understanding that Step 5 is the Olive Oil Mixture. I don’t believe this is a problem with the recipe. I would say this is a problem with English comprehension.
Made these for a dinner party. Prepped them earlier in the day and made the finishing herb oil. When my guests came I popped them in the oven while we had wine and appetizers. They came out gorgeous. Everyone raved about how cute they were and how delicious. Really wasn’t hard to prep with just a knife and cutting board.
[repost- for got to rate and fixed typos]
That’s so great, MJ! Thank you so much for sharing! 🙂
Delicious! Never would have thought of using basil. I also like to add a small dollop of sour cream on each. A couple of ideas to make slicing them easier: Place potato in the bowl of a wooden spoon before slicing – the edge of the spoon will keep you from cutting all the way through. Another option is to use wooden skewers or chopsticks, especially if you can find flat ones, placing the flat side down on cutting board. Same idea as the spoon – you won’t be able to cut all the way through the potato.
Great ideas, Susan. Thanks! 🙂
Super easy to make. I impressed the in-laws last weekend with these. They looked just like the photos.
That’s great!
Hasselback potatoes are the best, these look perfect!
Great recipes
Thank you!
These look is there any way to reheat them?
I’ve reheated them in the oven on a lower setting but as always, please use your best judgement when reheating. Hope that helps!
I have also cut them thru the next day and fried for breakfast instead of reheating whole potato 🙂
LOVE! all your recipes & Butters too! x0x0